Users
View users
- Go to Home.
- Click the Settings button.
- Click Users.
- The Manage Users screen opens.
- The User panel displays five fields:
- Active – A checkmark indicates the user is active.
- Username – the user's email address when first created (The corporate email address may be changed at a later time but the username cannot be changed.)
- Full Name – the full name of the user in the format <last name>, <first name>.
- Organization – the user's assigned organization
- Delete – the ability to remove the user
- Sort the list of users by clicking any eligible column header. Click again to alternate between ascending and descending order.

Add a user
- Click on the Settings button.
- Click Users.
- Click Add User.
- The Create User dialog appears.
- Complete the following fields:
- First name: Enter the user’s first name.
- Last name: Enter the user’s last name.
- Corporate email: Enter the user’s email address. The email address is used as the user login. (note: The corporate email can be changed later, but the users login will not change.)
- Newsroom system login: Newsroom system (examples: ENPS, iNews) login. This is required for CAMIO integration. If there is no newsroom system, then this login is not required.
- Password: Enter a password for the user.
- Confirm password: Re-enter the same password.
- Organization: This field is prepopulated.
- Click Create User.
- The user receive an email notification to log in.
- The user should change their password upon first login.
Complete user profiles
An administrator can complete additional user profile information.
- Contact Information
- Email2
- Work Phone
- Cell Phone
- Home Phone
- Other
- Account Settings
- Time Zone
- Language
- Order List Auto-Refresh Rate
- Permissions
- User Type (Administration)
- Charts
- Maps
- News
- Order
- Quotes
- Track
- Groups
- Assigned groups
- Projects
- Assigned projects
- Notifications
- Allow user to edit notifications
- Keep session alive for background notifications
Search for a user
To find or locate a user:
- Click the Field Selection dropdown,
- Select the desired field(s) to search or enter a search term in the right-hand field.
- Click Search Users.
- The results display.
To clear the search results or to see the full list of users:
- Clear any search parameters
- Click Search Users.
- The full list of users displays.
Edit a user
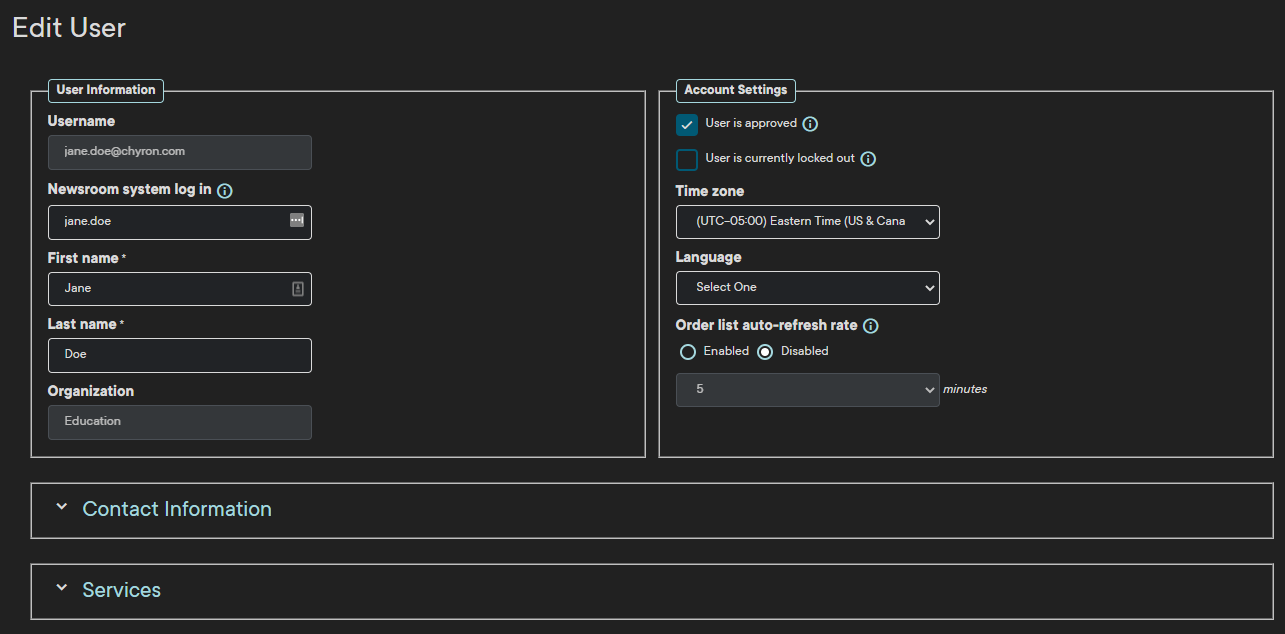
To access the Edit User page:
- In the list of users, click the Username of the specific user.
- The Edit User page opens.

The page is divided into administrative segments.
- Account Settings
- User is approved:
- If enabled, the user has access to Axis.
- If disabled, then the user no longer has access to the system and all of the user’s seats are relinquished, and the user’s specified service roles are not honored.
- User is currently locked out:
- Users may get locked out for incorrectly entering their password multiple times.
- If enabled, then the user has entered invalid credentials and cannot yet access the system.
- If disabled, then the user can retry credential entry.
- User is approved:
- Other User Settings: All other user settings shown in the Add User section can be edited.
Roles
User roles grant users various permissions across the Axis services. Administrators can view and manage User Roles for their organization in a spreadsheet format. User Roles can also be managed individually through the User menu.
User types
In general, a user is either an administrator (a Super User) or a regular user.
- Super Users (Administrators)
- Has all Axis administration permissions at the Organization level
- Has user, group, and project administration privileges
- Can view items in Administration
- Can edit items in Administration
- Users
- Has access to Axis
- Cannot view or edit items in Administration
Permissions by module
Each module offers varying levels of access. An administrator can configure how much access to grant.
Example: A user who specializes in asset management might be configured as follows: | |||
None No access | User Rights User access to module features | Administrator Rights User access to module features Admin access to module features | |
| Charts | x | ||
| Maps | x | ||
| News | x | ||
| Order* | √ | ||
| Quotes | x | ||
| Track | √ | ||
| *The Order module access can be limited to assigned roles and projects. | |||
View a list of roles
- Go to the organization hierarchy list.
- Select an organization, station, or department.
- The Manage User Roles page displays the following information:
- Usernames
- List of groups
- List of stations
- Services the user can access
- Level of access for each service.
- Number of active users per service
- Number of available seats per service
- Note: A new user cannot be added to a service if there are no available seats.