Overview
Content can be uploaded via the LIVE Uploader tool from PRIME and it is also possible to get directly to your AWS bucket through 3rd party software such as AWS S3 Browser. Images and Clips can be dragged and dropped on the LIVE Browser for last minute uploads needed during production like logos or sponsors for example
Access Keys
Access Keys are automatically changed every 90 days for security. We recommend noting the date change so you can retrieve the new keys when they become available. Access keys and key renewal dates can be found in Settings > About
IMPORTANT: Access keys expire every 90 days for security. It's important to update them in the PRIME uploader to continue to upload from PRIME. Dates are displayed in the about section
Option 1: Using Drag and Drop
Drag and Drop feature allow users to upload files from Windows Explorer onto the LIVE Browser by simply dragging and dropping the desired images and clips.
Upload content from your computer
- Locate a file on your Windows computer.
- Navigate to LIVE > Images or Clips tab.
- Drag and drop the image/clip onto the LIVE Browser.
Once the image or clip is dropped, click on the Search bar and enter the image or clip name or set the order to display as most recent
Option 2: Uploading Content from PRIME
Available in PRIME 4.6 or later. Information can be found here for creating templates in PRIME to use within LIVE.
Configure LIVE Uploader
- Navigate to PRIME > Config > Settings > LIVE Uploader.
- Click Add.
- Enter: Name, Region, Bucket Name, Access Key ID, Secret Access Key.
- Click Ok.
- Once saved, the new item will populate in the Name section.
Upload a Project
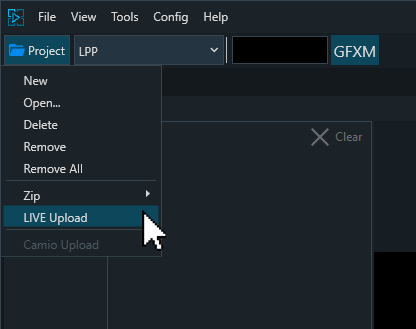
- From PRIME Playout
- Click 'Project Folder' on the menu bar
- LIVE uploader detects the entire project for upload
- In the LIVE Uploader window, check the checkbox for each file.
- Click Upload Selected.
- Monitor the the progress of the upload in the Status column.
- Unchanged assets will be skipped
Upload files
- Navigate to PRIME > Scenes.
- Select which file(s) to upload to LIVE
- Right-click on the file(s) and click LIVE Uploader.
- Select the LIVE Platform from the top right dropdown menu
- In the LIVE Uploader window, check the checkbox for each file.
- Additional files and folders can also be added
- Click Upload Selected.
- Monitor the the progress of the upload in the Status column.
- Unchanged assets will be skipped
The upload is now complete and and can be used in LIVE
Option 3: S3 Browser
The destination for your uploaded content is demo-us-1-assets-storage. You must have your own unique S3 bucket account.
Download the freeware for s3browser, click here https://s3browser.com/
- Click Accounts tab on the main page.
- Click Add New Account.
- If LPP folder does not appear, contact your Chyron administrator.
- Enter a unique Display Name, Access Key ID and Secret Access code provided in your LIVE environment About section, and select the Account Type: Amazon S3 Storage.
- Click Add New Account button.
A dialog box appears, asking if you want to add an External Bucket.
- Click Yes.
- The Add External Bucket dialog appears.
- Enter this name in the Bucket name field: demo-us-1-assets-storage.
- Click the Add External Bucket button, at the bottom of this dialog.
- Delete the default name and enter the bucket name in the field.
Now you can upload new content via the AWS S3 Browser tool
- Upload new content to the LPP folder.