Product is a container for graphics art that is going to be presented. Product button consists of two parts. An image button (1) and label button(2). The image button shows a thumbnail of the product. Label button shows product's name and indicates On-Air status by background color.
Insert product
Use Insert menu in the application menu or in the popup menu for Product bar.
Delete product
Use Edit → Delete menu item to delete last selected product or Delete menu item from popup of the product to delete.
Delete All selected products
Use Edit → Delete All Selected to delete all selected products from the project.
Lock product bar
Menu View → Ability to order products within the product bar, and then lock the position of the product.
Select product
- Click the product button. The products starts to be rendered in preview. All other products will get unselected.
- Click the products with CTRL key down to invert selection of a product. All other products keeps their state.
- Click two products with SHIFT key down to select all products between the two clicked.
When you hover the product button, corresponding product is highlighted in the video preview - outline of the product is rendered in contrast color.
State of the products is reflected by the background color of the label button.
| Background color | Description |
| Default state. The product is neither in preview nor in production. Only takes place in the product bar. | |
| Products in preview. You can manipulate them, but the product is not in production (not on air) | |
|
|
Products in production. Product with defined on-air duration shows the time left as orange/red progress bar. After the product finishes playing, it automatically goes to state Preview-only. |
When the product is in the preview, click the label button to set the desired product to production. All others will stop playing. To add a product to production together with other products, you have to hold CTRL key down before clicking the label button.
To put more products on-air at the same time, select them all with CTRL, so all are in the preview and use the GO button. There are several ways the production is finished.
- When your press the GO button again while in production
- After the duration of the product expires. This is a case of clips with non-loop behavior and products having set Duration property.
- Lost of tracking, for example scene cut in motion tracking.
Adjusting Position and Size
Select desired product. Drag it to desired position.
Some tracking types offers a special Perspective Move manipulator (see 1). Dragging the object by this manipulator moves the object with the current perspective defined by this product.
Use the resize manipulator (2) to adjust size
| Tip: Hold CTRL to resize the product in one axis only). |
You can rotate the product by the rotation manipulator (3). The rotation is done either in pitch (pitch tracking), screen (most of tracking types), or content local space (most of tracking types, hold SHIFT).
There are also corner manipulators (4) for non-linear perspective skew. Holding SHIFT while dragging corner manipulator moves horizontal neighbor in a mirror direction. Holding CTRL moves vertical neighbor in parallel.
Billboard Manipulator
Billboard tracking type provides distinctive set of manipulators.
Use billboard area (1) to move the billboard around the pitch.
To change the size of a billboard, use the resize manipulator (2).
You can rotate billboard around its vertical axis by using rotation manipulator (3).
To adjust billboard height above the field, use the manipulator (4).
Tip: To lean billboard back or front, use Rotation value in the Geometry rollout.
Color Correction
This allows you to adjust the colors of the product to fit current scene.
Parameter Alpha Gain changes linearity of key channel. This can be used when a product is too transparent or not transparent enough.
Parameter Opacity changes transparency. Value 0 is fully transparent. Value 1.0 is fully opaque.
Tracking
With tracking enabled the products can hold the position on the pitch where they were placed in the host environment.
| Item | Description |
| None | Tracking is disabled. Camera movement has no effect on product position. |
| Motion | Motion tracking is used to keep graphic object in the position in the scene. The tracking relies on textured scene. Tracking works reliably when camera movement is smooth and scene background has textured surfaces. The tracking drifts over time. |
| Standby Motion | Combination of None and Motion tracking. When the product is in preview, but not on-air yet, it behaves like None. As soon as you put the product on-air, it begins to behave like Motion tracking. This type of tracking is useful to set precisely place where the production begins. Later, just press the GO button and the production will behave like motion tracked. |
| Anchor | Graphics keeps its position in the anchor scene. See Anchor Tracking chapter for more detailed information. |
| Pitch | Automated tracking and localization. Properly defined pitch or calibrated camera needed. See Camera Tracking for sports chapter. |
| Billboard | Similar to the Pitch tracking. The product stands-up vertically on the pitch. |
| Billboard Facing | The billboard is automatically rotated to always face the camera. |
Keyer and Fade
Set a product to use chroma key by choosing one of the chroma keys available. Chroma keyers insert the graphics to the video only for areas where the color matches the settings of the keyers.
Chroma keyer
| Feature | Description |
| Chroma filter | During chroma key processing a filter is used to soften edges and reduce edge aliasing. Use “BLUR” to set it on |
| Chroma spill | Used to prevent spilling of the background color on the edges of the keyed graphics. There are choices to prevent spill for the most used keying background colors. |
Key:
1) Upper left image – both Filter and Spill suppression OFF
2) Upper right image – Filter OFF, Spill suppression GREEN
3) Lower left image – Filter BLUR, Spill suppression OFF
4) Lower right image – Filter BLUR, Spill suppression GREEN
You can get to the chroma key dialog through the chroma keyer button from the main toolbar. See more info in chapter Chroma Keyer.
Fade
Fade in/out are effects used at the beginning resp. end of the production. You can change the duration by setting new value to corresponding box. Mind that all values are in video field units.
Duration
You can specify the duration of production for several products without the need to end the production manually. Duration is set in field units. Mind that the real duration is this value plus duration of fade in/out.
File
Using this menu item in corresponding product you can change source file for the product (source image, clip, source free hand style...)
Although most product types do not follow file content change while in production, image product is able to update on-fly. Whenever the image file changes its content keeping the same size and packing, the image product is updated to reflect file change.
Production Type
Depending on the product type, it is possible to choose different mode of production control.
| Type | Summary |
| DIRECT | Production is controlled directly by the GO button. |
| AUTO | Selecting the product tells the system to start production whenever it becomes visible (see detection types).After the product goes out of view, the production automatically stops.To start/stop production, the product must become visible/invisible for at least Decision Time frames.Two different visibility detection types can be used:Tracking And Visibility – to be put in production, a product must have tracking available and must be inside the viewportTracking – to be put in production, a product must have tracking available, no matter if it is visible inside the viewport.Pressing the GO button can be used to stop ongoing production. After eventually leaving the view and coming back, the production starts again automatically. |
|
SEQUENTIAL (Group) |
After pressing GO, group members with definite production time are produced one after one. Any members with infinite production time are produced in parallel. |
|
PARALLEL (Group) |
After pressing GO, production of all grouped products starts immediately. |
Geometry
Geometry rollout allows to change numeric geometry properties, like position and size.
Depending on the tracking type, the editor uses different units.
|
Screen relative units [-1,-1] left bottom, [1,1] right top corner of screen |
None, Motion, Standby-Motion, Anchor |
| Pitch meters | Pitch, Billboard, Billboard Facing |
Clip
Clip parameter window allows to set basic clip properties.
| Action | Summary |
| Preview Frame | Select frame to be visible in preview window when clip is not playing. |
| Play ► | Play clip in preview window only. The clip will not be visible on video output. |
| Loop |
Once – Play clip once
|
| Loop Start | Set start point for looping. Frames before Loop Start are played once, the rest of the clip loops for defined number of periods set in the Loop property. |
| Pause |
Set pause points in the clip. Clip playback automatically pauses at selected positions. To resume playback press “Go” again. To set a pause point, select preview frame to requested pause point and press + To remove a pause point, select the pause point in the selection box and press - |
| Volume | Changed audio volume. If the clip contains audio you can adjust clip volume to match the background audio levels. Slider has range 0 – 100% |
Text
Content of the text and text properties can be edited in the Text editor. It is available in the popup menu of the Text product, or clicking on the small context button in the lower left corner of the product button. The context button gets visible after selection.
In case of text product, you're allowed to control formatting of the text. The text itself can contain special formatting sequences beginning with a backslash (\) character. See below the table of possible format sequences.
| Format Sequence | Description |
| \< | Decrease kerning space between the two surrounding characters. Number of '<' means amount of extra kerning. Sequence \< decreases kerning of one unit. Sequence /<<< decreases kerning of 3 units. |
| \> | Increase kerning space between the two surrounding characters. Number of '>. means amount of extra kerning as above. |
| \\ | Backslash itself. |
| \s | Non breaking space. |
| \n | New line. |
| \uXXXX | Unicode character with XXXX unicode hex value. |
| \iu | Following text will be rendered as upper index. To end upper index part and continue with normal text, use \in switch. |
| \il | Following text will be rendered as lower index. |
| \in | Following text will be rendered as normal text. |
Text “Text\iuupper\illower\inIndex” will be rendered as:
Usage of Application Variables
Text product allows you to use symbolic name of a variable, which is automatically translated to its value. Syntax of variable usage:
$(variable_name) will be translated to variable_value.
List of available variables is defined in Appendix C – Application Variables section.
Text presets
User Field Product = Virtual Placement allows you to prepare several version of text products. So you can have only one text product and switch between text strings.
In the text editor, you can see list of text presets (1). If you choose one of them, it will be copied to the text field and used in the text product. To add a text preset, just enter the text to the text field and press add button (2). To remove a preset, choose it in the list of presets and press the remove button (3).
Text presets are saved to the project file, so they are available only in one project.
Resolution
The higher the value is, the smoother text will be displayed. Adjust the text resolution before production to fit the smoothness requirements.
Alignment
For one line texts the products have minimal bounding box and the alignment change doesn't take effect. For multiple line texts you can choose alignment.
Billboard Shadow
Billboard tracking provides the ability to apply a shadow to the billboard this can be found by right clicking the product and selecting shadow from the dropdown menu.
The shadow option provides the following settings in order to adjust the billboard shadow.
| Enabled | Enables and disables shadow. |
| Texture | Select file for billboard shadow. |
| Opacity | Adjusting the transparency. |
| Offset | Ability to offset the shadow from the billboard. |
| Scale | Adjusting the size of the shadow. |
3D Billboard
Billboard tracking provides the ability to apply depth of field to the billboard this can be found by right clicking the product and selecting depth from the dropdown menu.
| Feature | Summary |
| Side Texture | Applies texture to 3D billboard. |
| Depth | Increase or decrease depth of field. |
| Opacity | Adjust how many side pixels are visible. |
Video Input
Video input product allows to insert incoming SDI video feed into another feed. In the Video editor available from the popup menu of the product button you can choose video source for the product:
- background feed (equals to the actually selected camera)
- auxiliary video texture feed. This feed must be configured as texture feed and is not listed among other camera feeds.
Keying
There are 2 keying types associated with the Video input:
Keying on the background of another feed (Keyer and Fade popup menu item)
Using own key to remove background from the Video texture feed (Video Keyer popup menu item).
Setting chroma key for the video texture
Select the video texture feed in the camera selector in the main toolbar. The video texture is shown in the preview. Follow the instructions for chroma key picking in the Chroma Keyer chapter.
Cropping
The texture itself might contain unwanted artifacts on the edges. Open the editor using the Video Keyer popup menu item and set crop boundaries. Video space has range of -1..1 in both axes, having 0 in the middle. (Example: Set -0.8..0.8 to crop 10% on each side.
Free Kick
Freekick needs properly calibrated cameras.
Freekick has two modes of production: Radius and Arrow. To switch between modes, use freekick rollout buttons. Alternatively, you can use a Numpad-period keyboard shortcut.
Radius mode
Radius mode shows animated circle around the ball position which should be clear of defending players. The size is automatically computed from calibration to be exactly 9.15 meters (10 yards).
Arrow mode
Arrow is used to show an arrow and distance of the free kick position to the goal. Head of the arrow is automatically placed to the middle of the goal and text with distance is added automatically as well.
Distance label
In Arrow mode also label with distance of the ball to the goal is shown. The distance can be shown virtually on the pitch, next to the ball. Adjust label position using the mouse wheel.
2D title label
You can also use 2D title on the screen. To use this label mode, create new Free Kick product using the product editor for freekick. Guide to create 2D title is in the appendix of this document, Free Kick Style editor section.
Events
When freekick manipulator is moved, ball distance changes are sent in form of events.
<Event app="VP" source="freekick">
<GoalDistance value="46.656567"/>
</Event>Ball Speed
If the ball speed is enabled (see Freekick Style Editor below), it is automatically computed during every freekick. The result is ready to use immediately after the kick. Computed value is shown in the freekick editor, next to the Arrow/Radius switch. Press the Ball Speed button, and the label with the speed is shown. Production of Arrow/Radius is automatically finished.
The style of the label is configurable. To customize the label appearance, use the Free Kick Style Editor, described in the appendix.
Free Kick Style Editor
Free Kick style editor allows you to change the appearance of the free kick graphics. First open an existing freekick style or create a new one. Open and New actions are available in the menu. Change the setting and don't forget to save. As the style is customized, new freekick products can be created. Just select the appropriate freekick style during adding new freekick products. Freekick settings are copied to the freekick product during load, it means style change is not applied on other freekick products having the same style.
A. Arrow
- Select arrow image/clip. The image should have “stretchable” areas. It means, area that is stretched to fit the distance from ball to the goal. In the case of clip you can choose play loops and preview frame (Pivot frame). (1)
- Define image bounds and stretchable areas (Stretch start and Stretch end). You can do that in graphic preview (2) or numeric editors (3). In case of the image is not well seen, you can swap between bright and dark background patterns via preview pop-up menu. This feature is available in all style editors with image or clip preview.
- Set play options – Fade in/out, thickness and growth duration (in frames).
B. Radius
Shows 9.15 m (10 yards) radius around the ball.
- Select clip to play. (1) It is recommended to enable loop for shorter clips. You can set Loop Start frame when loop is enabled. See Clip product for more information about Loop start. Pivot frame is equal to pause frame in case of no loop.
- Set clip boundaries. Center is where the clip will be dragged. Recommended to keep the value in the middle of the clip frame.
- Set fade in/out and alignment:Right edge toward goal: The radius 'points' to the middle of the goal.
Pitch aligned: The radius is 'parallel' to the pitch side lines.
C1. Virtual Label
- During the arrow production, a label with distance is shown. Select On Pitch (1) choice to have virtual text next to the ball.
- Select font and color. Set format. Usually, accuracy to one decimal place is enough. Set format to “#.#0 m” for one decimal place.
- Set text height and distance from the ball position.
C2. 2D Label
- Select 2D title in the mode field.
- Set text properties. Same as On Pitch Label.
- Select image background for the title. Set size (pixels) and position of the label background. Position of the label is in normalized coordinates, it means <-1..1> in both x and y axis. [-1,-1] is in the lower left corner of the screen, [1,1] in the upper left corner. We prepare graphic and more intuitive 2D title adjustment.
- Set position of the text. Position is set relative to the screen, it means the same way as point 3.
- Set fade in/out.
D. Ball Speed Label
Customizing Ball Speed Label is pretty much the same as 2D Distance title. Editor for this property has the same structure and the fields have the same meaning.
Offside
Offside needs properly calibrated cameras. Also make sure, offside cameras are recorded (see Multiple camera I/O in this document and Installation Guide, section Cameras.) Offside is desired to be fully controlled from the MCS3 Jog/Shuttle.
Offside Workflow
- Add offside product to the project. Offside is selected and put on air automatically to speed up the offside preparation. There's no need to select/put on air manually. Always the first (the left most in the product bar) is used.
- An offside situation happens.
- Stop the live feed using the STOP button on the Jog/Shuttle.
- The camera is automatically switched to recorder so you can see the end of the recorded footage. At this point you can still switch between recorded cameras. The offside product is automatically selected and inserted into the video.
- Jog back to the time of the offside.
- Click at the last defending player. The offside line is placed at the position of the mouse. It can be adjusted after position has been set. The current timecode (Offside Time) is used as a pause point when the offside video is replayed.
- The offside has been set. Jog back in time (~ 3 seconds) or use the Preroll button, which jumps specified seconds back (preroll time in seconds can be specified in Config Editor at tab Controller as value of action Preroll). This is to start the offside playback smoothly.
- Press the ON-AIR button (W6)
- Play the offside by the Play button. Playback speed is configurable and default value is 100%. You can set different speed from the application menu for playback actions or assign multiple playback actions with different speed to the Jog/Shuttle buttons. More in the Installation Guide, chapter Jog/Shuttle. Current speed, that will be used for playback, is displayed in the status bar during recorder-playback mode.
- From actual point the playback begins and it is paused at Offside time defined in point 6. Here the playback smoothly stops. You can jog around to show the offside sequence slowly.
- Press the Play button. It starts playback until the end of the recorded footage.
- Press the ON-AIR button again or switch to live camera to finish the offside production.
- You can export played footage as offside clip, and replay it later. The recorded footage is otherwise rewritten as you get back to live camera. See RAM Recorder chapter. The export process is executed on the background. So you can use the system while the exporting is still in progress.
Two offside lines in one clip
Fifa rules allow to have 2 offside situations, one after another. You can define 2 offside lines, one for each situation.
The workflow for the second line:
- Follow steps 1-6 from above
- Jog to the 2nd offside situation
- Press Add offside button next to the Offside product button.
- Click the last defending player again.
- Follow the steps 7–10 from above
- The playback is stopped on the first offside situation. Press play. The first offside fades out and the playback plays forward to the 2nd situation, where it smoothly stops and shows the 2nd offside line.
- Follow the steps 11–13 from above.
During the offside production and preparation, you can see timeline with marked timecodes.
1) Timecode where the live playback was stopped and recorder activated.
2) Timecode, where the offside was placed
3) Timecode, where are you now in the recorded footage
4) Timecode, where automatic rewind is provided by pressing the Preroll button.
The timeline shows small white ticks corresponding to one second of the recorded footage.
Offside Style Editor
Offside style editor serves to customize offside graphics appearance.
- Texture: You can change the graphics of the offside line. Either still images or GTC clips are supported.
- Offside line and offside shadowing. Specify which part of the graphics should be used as line at position of the offside. The rest of the graphics will be stretched to fill the rest of the pitch.
- Other settings
- Fade in/out: fade of the graphic in field units.
- Width – width of the offside graphics (line + shadowing). The line is drawn in perspective, the width value specifies the number of pixels of the offside graphics at the bottom of the screen.
- Line over – when set to 0, the offside lines begins and ends at pitch side lines. You can set any value higher (in pitch meters), and the line will overlap side lines.
- Shadow direction to goal: You can mirror offside graphics display. Set it checked, if you want to have the shadowing is drawn in 'offside area'. When unchecked, the shadowing is drawn in 'onside area'.
- Deceleration duration: Duration of play rate deceleration before auto-stopping at offside time.
The editor is not modal, sou you can have an Offside product in the product bar, open it's style file and when you save the changes and reselect the Offside product, you'll see immediately the effect.
See RAM Recorder section on how to store an offside clip for later replay.
Offside line also have the ability to show the distance between the player and the goal.
This is done using the Tracab product under the offside tab. (Tracab data integration is required)
Please refer to the Tracab Product setup section.
Offside2
A new implementation of Offside product focuses on the precision of the offside line. The user is required to choose the frame important for the offside situation and place defensive and attacking lines into the preview video.
The Offside2 product might be disabled. You can enable it manually in the Config editor → Advanced tab. Find or add the 'Offside2' product entry in the Products section and change value of 'enabled' attribute to '1'.
<Products>
<Product enabled="1" type="Offside2"/>
</Products>Offside Workflow
The entire workflow of the Offside2 product is split into three steps:
1. Locate the offside situation time.
After stopping the video, the Offside2 product gets selected automatically. By clicking mouse into preview where the offside situation happened, the Pick Frame step gets activated. A strip of frames shows up atop of the preview window. The center frame is showing the current time whereas the surrounding frames are taken from the frames before and after offside situation. Clicking on non-center frame seeks to a time represented by the frame.
Clicking the central frame confirms the selection of the offside time and the product advances to the next step:
2. Place Defender line.
Clicking into the preview windows places a defender line. It is possible to refine defender position by further clicking into the preview or by pressing and dragging the mouse. To provide better aid for exact placement of the line, a zoomed area shows in the preview, displaying the video area around the defender position. Note that the actual offside line is defined by the edge of the graphic line rather than its center.
When defender line is placed with satisfactory precision, clicking to the Attacker Line button in the Product bar advances to the last step:
3. Place Attacker line
Attacker line is placed in the same way as the Defender line.
Offside position defined from multiple angles
To increase the accuracy of the offside line, multiple angles can be used to triangulate a precise 3d point for the offside position.
Steps:
- Select the appropriate frame of interest for the offside situation as per the above section for the Offside2 product.
- Click the 3D button in the Product bar which enables ‘3D’ picking. Now click on a point on a player that is the part of the body related to the offside situation (this can be off the ground). For example upper body part. Note that the change here from 2D setup is that no line is visualized yet. Just the crosshair.
- Change camera angle. Either by remote controller or by shortcut toolbar.
- Clicks again on the same point on the player.
- Once clicked the offside line is visualized. The line now does not go through the cross hair anymore as the line is placed on the ground, but the vertical line does.
- Switch between the cameras shows the crosshair at the position where the user clicked. The position can be changed if required and the offside line is recalculated.
- Operator can go back to 2D anytime by toggling off the 3D button
The above process should be used for both the attacking and defending lines and each have their own 3D button to activate this mode of selection.
The Virtual Placement Offside Line 2 has been ratified and certified by FIFA as an officially approved technology to be used to adjudicate offside lines in an official officiating capacity:
https://football-technology.fifa.com/en/resource-hub/certified-product-database/football-technologies/offside/certified-systems
Down and Distance
Down and Distance is a product that displays Scrimmage and Down line in American football game. A feather graphic (a label showing the play number and Yards to go) is optionally shown.
Setup
Start a new instance of Virtual Placement, ensuring that Pitch Tracking with 3 cameras or Scene Tracking with 1 camera is selected in the config, also the Product Down and Distance will need to be active.
Correct camera calibration must be loaded. (See the "Camera tracking for sports" section.)
The Down and Distance product might be disabled. You can enable it manually in the Config editor → Advanced tab. Find the 'DownAndDistance' product entry in the Products section and change value of 'enabled' attribute to '1'.
<Products>
<Product enabled="1" type="DownAndDistance"/>
</Products>Setting up a new feather
Once Virtual Placement has been started, right click in the white space above the video preview and you will be presented with a list of products that you can insert. Pick 'Down & Distance' to insert a new instance of 'Down & Distance'
Predefined NFL feather textures as well as psd file are available at the Chyron Download Area (nfl_feathers_data.zip).
NB: Your list of products will vary depending on the products that are activated with your licence.
Once you have inserted your 'Down & Distance' product, you can start the process of setting up the style. You will now have the 'Down & Distance' product in the product workspace. To setup the style for this product, right click on the product (Drawing 2: Load Style) and pick 'Style'. From here you can load a style that has already been created or you can define the style manually in the Style editor..
Once you have selected the 'Style' option you will be presented with a pop-up to handle the style file to the selected product. From here you have 5 options:
- Import – Load Style File to current product
- Export – Save current settings to style file
- Create the style manually or customize previously imported style
- OK – Close dialog and confirm
- Cancel – Close dialog and remove changes
Import
Importing will load a premade style to the selected product. Pressing import, will load a standard Windows file picker window. The style has a file extension of .fts, the default style is called 'down_and_distance.fts' and it is included in the football_default_data.zip which is available on the download area;
Press open to apply the style to the product. All the different products can have different styles applied to them.
Editing the style
The Style editor is open with default style properties. You can begin with those and adjust them or customize previously imported styles.
Export
Exporting will save content of the Style editor into a standalone file which can be imported later or transferred to another computer.
Line Properties
| Property | Summary |
| Fade In/Out | The duration of the fade when the graphic is sent on air and removed from the output. This is independent for both line and feather. |
| Texture/File |
This is the name of the file, this should be in the folder “c:\<user>\documents\ AKIVisionProjects\” .png is the suggested format, although other file types that support alpha channels are supported. Default texture is placed in the football_default_data.zip which is available on the download area. The texture is vertically stretched to cover the width of the football field. |
| Width | The width of the line in meters. |
| Away/Dual Color | Enables using separate color when away team is selected |
| Scrimmage/Down line color | These are the RGB values of each of the 3 lines. The line of scrimmage is always the same color, and it's possible to set the down and distance color to be a unique color for the last down (4th down for NFL, NCAA).Option to use Away/Dual color to use team colored lines |
| Opacity | Opacity of the Down/Scrimmage line. |
| Adjustment Offset | This value is used when the virtual line covers a 5 yard line on the field. If so, the virtual line is shifted by a given offset (in meters). Negative values mean shifting to right on the right hand side of the field and to the left on the left hand side of the field |
| Line Over | Zero value means the virtual lines are drawn from right between the side lines. Non-zero value (in meters) means the virtual lines exceed computed field border. |
Style Editor: Feather tab, Simple mode
Feather Text properties
| Property | Summary |
| Text | Text on the feather. |
| Style | Editor to edit text styles. |
| Fade In/Out | Duration of the fade effect of the text background. |
| Delay In/Out | The production In/Out is delayed by specified number of video fields. The delay is between user action to start/stop production and time when the production start/stop sequence is launched (e. g. delay from request to start production and time when the graphics starts fading in). |
| Text Size | Width and height (in meters) of the text on the field. |
Text
Default value to the Text field is $(DOWN) & $(DISTANCE). Fields '$(DOWN)' and '$ (DISTANCE)' are replaced by their real values. You can skip one of those values if desired or e. g. change '&' to 'and' or replace the value with any text of your choice. You can also use any of the available variables (see Appendix C – Application Variables).
Customize Distance wording
Distance can have special values of 'goal' (down line equals to the Goal line) and 'inches' (Distance is less than 1 yd). Those values can be customized using formatting options of the Variables.
| Example: | |
| $(DISTANCE;Goal) | Change 'goal' to 'Goal' |
| $(DISTANCE;Goal;Inches) | Change 'goal' to 'Goal' and 'inches' to 'Inches' |
To edit text style simply click the Edit... button next to the Style label. A new dialog with editors for all available text properties appear.
Meaning of each field is described in the tooltip is shown when you hover the mouse cursor on the field for a moment.
Using capitals
If you want the text to be rendered in capitals, set a non-zero value to the Capitals ratio field.
Zero value makes all characters keep its upper/lower case form as defined in the Text field in the Style editor.
Other values cause all character to be rendered in upper case, but when the character was defined as lower case then this character is scaled down by the Capitals Ratio value.
(example: set 0.7 to archive following effect: '3RD & 8').
Feather Texture properties
| Fade In/Out | Duration of the fade effect of the feather texture. |
| Opacity | Opacity of the Feather texture line. |
| Play Mode | Used only when the feather texture is a .gtc clip. It can either loop from specified frame to the end of the clip or pause at specified frame. In Loop mode the clip starts to fade-out on user request to stop production. In Pause mode the clip is unpaused and plays to its end. Loop Start/ Pause Frame value is defined in the field bellow. |
| Mode |
Simple – Only one texture for the feather is defined. Texture for opposite attack direction is simply horizontally flipped version of the original texture. Position on the field and text offset remains the same. Advanced – This mode allows to have different textures for both Home and Away team and for both attack directions. Correct texture is chosen automatically. In Advanced mode you can setup another set of four textures with sponsor logos etc. During production you can one-click switch between these sets of Feather textures. |
| Texture | Define image or .gtc texture of the feather. In Simple mode the texture is pointing from left to right. It is horizontally flipped for the other direction. In Advanced mode – first row of Home and Away textures are pointing to the left and in second row the textures are pointing to the right. |
| Size | Size of the feather on the field in meters. |
| Pause/Loop start |
Used only when the feather texture is a .gtc clip. Meaning of the field is depended on current Play Mode setting.
|
| Position | These values adjust how far in space the object should be from the line of scrimmage (in meters). Use negative value in x to move the feather to left and in y to move the feather close to the camera. Positive values have opposite effect. |
| Text Offset | These values adjust how far in space the object should be from the Feather texture (in meters). Use negative value in x to move the feather to left and in y to move the feather close to the camera. Positive values have opposite effect. |
Advanced Mode
Style Editor – Feather tab, Advanced mode
| Additional feather text properties | |
| Relative Alignment |
Option to have text follow the alignment of the arrow. Arrow facing left text is aligned left, if sides are switched alignment changes to right in order for text to follow the feather direction in all cases. |
Sponsor mode allows to have another four version of the Feather texture with sponsor logos. During production you can easily switch Feather with or without sponsor. To enable this mode, simply check the 'With Sponsors' box.
Meaning of all fields in Advanced mode is the same as in Simple mode. Since the textures must not be symmetric, you can set position on the Scrimmage Line and offset of the Text individually for each Texture.
It is necessary to have correctly set side for Home team when using Advanced mode. Use the arrow button in the upper left corner of the Down & Distance editor to set the side. Make sure the item is checked when Home team plays from left to right and unchecked when Home team plays from right to left.
Changing Feather mode
You can change the production straight from the Down&Distance product button. Buttons Feather production modes are visible all the time the product is selected.
| ON | Show Feather. |
| ON + S | Show Feather with sponsors. |
| OFF | Hide Feather. Only Down and Scrimmage lines are rendered. |
Change of all modes can be mapped onto keyboard shortcuts in the config editor. List of available actions:
| FeatherOFF | Hide Feather and text. Only lines are visible. |
| FeatherON | Show Feather. |
| FeatherONWithSponsors | Show Feather with sponsors. |
| FeatherOnOffSwitch | Hide Feather if visible or show when invisible. |
These shortcuts change Feather mode in all selected products.
Changing feather position
The feather position on the Scrimmage line defined in style might be not suitable in all situations (e.g. the feather collides with players). To solve such situations you can have several feather positions predefined and change the position by a keyboard shortcut. Go to the Config Editor → Keyboard tab. Add action called FeatherSetPosition. Value of the action is the distance of the feather from the center of the field in meters (e. g. setting -15 sets the feather 15 meters from the field center closer to the camera).
You can have several actions defined with various positions.
Since Virtual Placement 7.6, it is possible to adjust feather position directly using a mouse or using keyboard shortcuts in user set increments.
Using a sponsor with Down and Distance
There are two ways to use a sponsors logo with the system. The first is to build the sponsors logo into the feather images. Then fill in the texture names into corresponding fields in the Style editor. The feathers with sponsors must not be in the Sponsors field in the Style editor. You can use them in the Advanced mode without sponsors, but you will lose possibility to show regular feather without sponsors.
The second method is to create a new image product and have the tracking method set to 'pitch'. This will ensure the perspective is correct, but the logo will have to be positioned manually for each usage.
Play Clock
Play clock is valid between 2 plays. It shows time for the attacking team to snap the ball for the start of the next play.
The clock must be supported by currently used Down&Distance protocol (see Remote data source). The clock from the protocol is available as variable named USERTIME (see Appendix C – Application Variables for formatting options). Down&Distance data protocol must be set as time source for the User time (See Installation Guide, chapter Down & Distance online data).
Production of the clock is started automatically when the down-counting clock reaches defined trigger.
Production of the clock is stopped manually by repressing the clock button next to the Down&Distance product button or toggled using keyboard shortcut SPACE. The feather and the lines stay on-air.
Clock style
| Feature | Description |
| Enabled | Enable the whole clock functionality |
| Auto ON | Clock trigger. The gfx will be shown when play clock reaches this value. |
| Auto OFF | Clock trigger. The gfx will be removed when play clock reaches this value. |
| Color From | Value for when countdown changes text to user set color and if its activated. |
| Home Text | Home text to display. |
| Away Text | Away text to display. |
| Style | Editor to edit text styles for both home and away team. |
| Size | Size of the gfx element. Size units are dependent on Mode. |
| Position | Position of the background relative to the feather in XYZ |
| Text offset | Offset of the clock text from the clock background in XYZ |
| Mode |
Production mode.
|
| Tracking | Billboard or model option for play clock to be standing up or displayed on the ground together with the feather |
3D gfx elements use pitch tracking and are keyed.
Down and Scrimmage line position controls
The dialog is available in menu Tools → Down and Distance.
It allows to change position of both lines and number of play.
Remote data source
Data for the Down and Distance product (positions of the lines, play number..) might be obtained from an online source. See Installation Guide for information about supported protocols and their configuration.
Some fields might not be supported by all protocols. These need to be controlled by the operator (e. g. side of the field of the Scrimmage line).
Supported protocols don't carry information about assignment of both teams to left or right hand side of the pitch. The operator must set the pitch side for Home team manually in the menu available from the Settings button.
In case the incoming data are incorrect or not suitable for the moment, you can anytime set the values manually. Once you do any manual change (or deselect the 'Auto' check box), the system stops using the values from the remote data source. Select the 'Auto' check box for transition back to automatic data reading mode.
You can see the delivered data values above the edit boxes or inside the expanded menu (Optional).
Value that differs from the one used for graphics rendering are displayed with highlighted color.
There are two Update buttons. The upper one replaces current Down line position by the delivered value, the second one replaces position of the Scrimmage line.
Fine adjustments of line positions
Sometimes you may need to quickly make a fine adjustment of the line position.
Using mousewheel
Just click in the field to adjust and scroll the mouse wheel while holding the Shift key down. With shift key down, the scroll step is 0.1 yd.
Using keyboard commands
Add 0.1 yds to the scrimmage line using HOME and -0.1 yds using END on keyboard
Add 1.0 yds to the scrimmage line using PAGE_UP and -1.0 yds using PAGE_DOWN
50 yd Switch
If data for down and distance is not available, users can activate the 50 yd switch for seamless crossing of the 50 yd line.
This allows users to cross the 50 yd line without having to switch between L and R by just scrolling the mousewheel up to go forward and mousewheel down to go backwards on the field, direction of play is controlled by the arrows.
Scrimmage line will never cross the down line and the tool will push the down line 10 yards forward automatically whenever scrimmage line hits the down line.
Adjust opacity of all graphics
From the popup menu for a Down & Distance product pick Opacity item. Opacity editor appears next to the Product button. Change the value to change the opacity of all graphics that belong to the Product.
Drag the slider to make the Feather and Lines more or less transparent.
This change has a multiplicative effect on opacity values of all single graphics elements previously set in the Style editor.
Different chroma keyer for Line and Feather
From the popup menu for a Down & Distance product pick Keyer item. The editor that appears contains the following items:
| Feature | Description |
| Line Key | Chroma Keyer instance for Scrimmage and Down line. |
| Feather Key | Chroma Keyer instance for Feather and text.. |
| Chroma Filter | Edge aliasing filter (see Keyer and Fade). |
Red Zone
Product to highlight the red zone area in American football
Red Zone workflow
- Set where the ball is placed on the field (max 20 yd line)
- Activate RedZone tool, zone will by default appear on both ends of the field
- Set it to only be shown on Left or Right side if needed
- Deactivated RedZone when you want it to disappear
RedZone Style Editor
Meaning of the Style editor fields:
| Field | Description |
| Color | Set color of RedZone fill. |
| Opacity | Opacity of the RedZone fill texture. |
| Enabled | Enabling outline of RedZone tool. |
| Color | Set color of RedZone outline. |
| Opacity | Opacity of the RedZone outline texture. |
| Size | Size of the RedZone outline texture. |
| Fade In/Out | The duration of the fade when the graphic is sent on air and removed from the output. |
| Import | Import saved settings for tool |
| Export | Export settings for tool |
Field Goal Target
Product to highlight home and away teams field goal targets in American football
Field Goal target workflow
- Select which sides field goal target you want to display by pressing Home or Away
- Set attacking direction of team selected by pressing Left or Right
- Activate Field Goal Target tool to put on-air
- Deactivated Field Goal Target tool when you want it to disappear
Style Editor
Meaning of the Style editor fields:
| Field | Description |
| Home/Away File | Set different textures for home/away team target lines, if generic texture is used set same in both |
| Loop Start | Set start point for looping. Frames before Loop Start are played once, the rest of the clip loops for defined number of periods set in the Loop property. |
| Width | Width of field goal target texture (in meters). |
| Opacity | Opacity of field goal target texture. |
| Fade In/Out | The duration of the fade when the graphic is sent on air and removed from the output. |
| Line Offset | This value is used when the virtual line covers a 5 yard line on the field. If so, the virtual line is shifted by a given offset (in meters). Negative values mean shifting to right on the right hand side of the field and to the left on the left hand side of the field |
| Home/Away Target | Each team's respective target line for field goals |
| Import | Import saved settings for tool |
| Export | Export settings for tool to saved file |
Ball speed
This type of product is designed for measurement of ball speed during free kicks etc.
The product requires pitch tracking and camera recorder enabled. Tracking and keying are not supported.
Meaning of the controls shown next to the Product button:
| UI | Description |
| Start point not defined. Click the ball at time of the kick. | |
| Start point defined. You can still redefine position of the ball. Press RESET to define the Start at other time. | |
| End point not defined. Click the ball at the end of the kick. | |
| End point defined at current time. You can still redefine position of the ball. Press RESET to start again. | |
| Both Start and End points are defined but none of them is equal to current time. | |
| RESET | Reset Start and End points. |
Ball speed workflow
- Add Ball speed product to the project and setup its style. Only one Ball speed product can be selected at a time. Ball speed products can be selected only when a Recorder camera is actually selected.
- Stop the live feed using the STOP button on the Jog/Shuttle (or use Camera button in the toolbar)
- The camera is automatically switched to recorder so you can see end of the recorded footage. At this point you can still switch between recorded cameras.
- Select the Ball speed product.
- Define Start point: jog back to the time where the player kicks the ball and click the ball in the preview.
- Define End point: jog to time where it is desired to stop the measurement (e. g. the ball leaves the field). Click the ball position on the ground. In case the ball is in the air, click approximately the point below the ball on the field.
- Now cue back in the recorder footage where the video playback should start.
- Press GO/ON-AIR button to start production.
- Press Play button to start playback.
- The graphics production starts certain number of video frames/fields prior to End point (see Fade In Delay in the Style editor).
- The video might at End point (see Auto Stop in the Style editor). Press Play button to continue playback.
- The graphics production ends certain number of video frames/fields after the End point (see Fade Out Delay in the style editor) or manually by unpressing the GO button.
Style editor
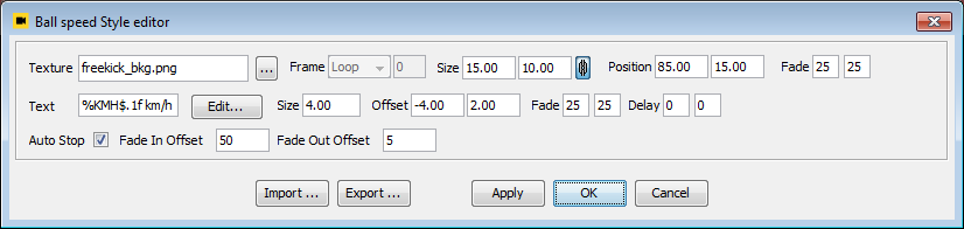
Meaning of the Style editor fields:
| Field | Description |
| Texture | Background image/gtc clip below the speed text |
| Texture/Text Size | Size of the background [as a percentage of the screen] |
| Texture position | Background position [as a percentage of the screen] |
| Fade | Fade in/out [in frames/fields] |
| Text Offset | Offset from the background [as a percentage of the screen] |
| Text Delay In | The text production is delayed by specified number of video frames/fields |
| Text Delay Out | The text production cut-off is delayed by specified number of video frames/fields |
| Text | Text formatting string |
| Text style | Open Text style editor by the 'Edit...' button to modify the style (color, alignment...) |
| Auto Stop | When checked, the video playback will stop at End point of the kick. Press Play button to continue video playback. |
| Fade In Offset | Production start is computed from End point of the kick. Fade In Offset defines how many video frames/fields the production will start prior to End point (e. g. value 50 will start the production 1 second before the End point in 50 fps video format). |
| Fade Out Offset | Production end is computed from End point of the kick. Fade Out Offset defines how many video frames/fields the production will end after the End point (e. g. value 50 will end the production 1 second after the End point in 50 fps video format). |
Text Formatting
Some graphics can contain a text field. There are values provided by the application that can be used in formatted string. See table of all supported variable names on page.
The format string is compatible with ANSI C printf() function. Example:
- %MPH$.1f – picks value “Speed in miles/hour” and uses one decimal point e. g. '53.2'
- 'Speed: %KMH$.0f km/h' will be transformed to e. g. 'Speed: 53 km/h'
Supported value names
| Abbreviation | Description |
| KMH | Speed in km/h |
| MPH | Speed in miles/h |
| MS | Speed in m/s |
Events
An event is being sent every time the ball speed changes:
<Event app="VP" source="BallSpeed">
<BallSpeed value="12.18691"/>
</Event> Group
Group is a generic product which contains multiple child products, and allow you to control multiple products by a single click. Group can contain only Images, Clips, Video Inputs and Text products.
Create a group using menu Insert → Group. A button with folder icon (1) appears in the product bar. At this time the group is still empty. You can add product into a group in two ways.
- Move an existing product to a group. This can be done via Move to Group popup menu on group-compatible products (Image, Clip, Text, Video Input).
- Use the popup menu on Group button, submenu Insert.
Remove or move-out one of child products can be done from the popup menu of the group button.
Group button contains small buttons (2) for each contained product. The button can be used to adjust product specific parameters, like e. g. Color Correction. It can be done in very similar way as described above in the Products section.
Adjust Position and Size
Hit the group button. All products appear on the screen. Adjust all products in the way described a few paragraphs above.
Adjust Child Order
If children products overlap, you can change the order of display from the child popup menu (3), using the item Arrange.
Make a Child Invisible
When a child is invisible then it is neither visible in the preview or on the output.
Group can be used for more complicated production scenarios. You might find useful to hide all but one selected child. This function is in View menu in the application menu bar, item “Show Only Selected Child”. This hides the children from preview only. When you put the group to on-air then all children appears again (this functionality is turned off).
Show/Hide Child buttons
Each time the group is selected, the panel with child buttons appears. There is a switch to enable/disable automatic displaying of the child buttons. The switch is controlled by the small button with arrow icon in the lower right corner.
Sponsors
Products Offside and Free Kick allow to show additional graphics - sponsors. As a sponsor you can assign basic products like Image, Clip, Text or Video. Each sponsor can have its own individual tracking.
There are two main stages for operating sponsor:
- Editing stage
- Production stage
Do not combine editing and production at the same time! Sponsor must not appear on-air. We recommend you not to operate in the sponsor editors during production.
Sponsor Editing
Editing stage serves for initial positioning of sponsors. Select one of the sponsors in the Sponsor editor.
FreeKick – you can see the sponsor immediately .
Offside – you will be guided to place the offside line first. System automatically chooses playback of one offside cameras. Now you can see the selected sponsor.
Sponsor Production
Production stage serves to put sponsors on-air. This stage is the same as regular production without sponsors.
FreeKick
Production start : Sponsors are shown immediately after you press the GO button.
Production end: Sponsor production is finished together with FreeKick. To finish production press the GO button again.
Offside
Sponsors are bounded the time you place the offside line.
Usual offside workflow: Press STOP on remote control device. Go back in footage (preroll) and then press PLAY on remote control device.
Production start: Sponsors appear automatically in defined time before offside line appears.
Production end: Finish the production by one of these methods:
- setting of finite duration to the sponsor products (see Duration editor chapter)
- deselect Offside product (ESC key)
- switch camera.
Otherwise the sponsor production runs until you perform one of these actions.
Insert Sponsor
Sponsor actions are accessible via Sponsor menu items in the Offside/Free Kick popup menu. To add a sponsor, choose Insert Sponsor action. Select type of product you want to add.
Sponsor Editor
The Sponsor Editor is similar to Group children editor. From the popup menu of each sponsor you can access property editors, that are accessible in normal Image/Clip/Text/Video products (Color Correction, Tracking etc.).
Moreover, after Sponsor selection (1), Sponsor Property editor gets accessible (2). The editor offers few choices related to sponsor production only.
- Visible – Says if the product should take place in the production. The item is useful, when you want to prepare for production of several sponsors, each at a different time. You can adjust all properties, and during the match just toggle the Visible flag to change actual sponsor, without need to adjust it's parameters during the match.
- Relative Start – for Offside only (not accessible for Free Kick). For timing of production relative to time (in field units), when the offside line gets visible. To display sponsor 50 fields before the offside line starts to fade in, set “-50” to the edit box.
- Placement – Offers automatic choice of area, where the sponsor will be displayed.
| Descriptions | |
| PRESERVE | No automatic placement. The sponsor appears where you place it. |
|
In case of Offside and tracking Pitch, Billboard, Billboard Facing: Sponsor holds relative distance to offside line. Position is horizontally flipped based on pitch side where is sponsor placed. Example: Sponsor is kept between offside line and the goal all the time, pitch-side independent. | |
| SUITABLE |
Tracking None Automatic left/right hand side displacement. The system decides where to place sponsor to avoid collision with Offside/FreeKick graphics. It uses Horizontal flipping method (applied to position of the sponsor only, the logo is naturally not flipped) to avoid collision. Example: You set sponsor to upper right corner of the video and choose SUITABLE placement type. If the Offside/FreeKick graphics is on the right hand side of the video, the sponsor is displayed in the upper left corner and vice versa. |
| LEFT_SUITABLE |
Tracking None Similar rules as in SUITABLE are used. The system doesn't choose side, but whether to display the sponsor or not. If there's possibility of collision, the sponsor stays hidden. If collision is not detected, sponsor is displayed at left hand side (where you place it). Example: You may want to display sponsor either in upper left or lower right corner, collision-safe. Add two same sponsors, place them to desired places, distinguish them by the Placement property. |
|
In case of Offside and tracking Pitch, Billboard, Billboard Facing: Shows sponsor either on desired side or not at all. | |
| RIGHT_SUITABLE | Opposite to LEFT_SUITABLE. |
| ROTATE_180 |
Only for Offside and tracking Pitch Very similar to SUITABLE. Moreover, the sponsor is rotated 180 ccw when is automatically placed on the opposite side. The goal is to keep specific sponsor human readable. Example: You may have a sponsor with human-readable content. This choice will help to keep it readable. |
| FOLLOW |
Only for FreeKick Enables following the ball position. You can change relative sponsor offset to the ball position by moving the sponsor. Change tracking causes sponsor re-arranging to the ball position to help user to set nice initial position. |
Allowed combination of placement and tracking
OFFSIDE
| Placement Tracking | PRESERVE | SUITABLE |
LEFT SUITABLE |
RIGHT SUITABLE |
ROTATE 180 |
| NONE | yes | yes | yes | yes | no |
| PITCH | yes | no | yes | yes | yes |
| BILLBOARD | yes | no | yes | yes | no |
|
BILLBOARD FACING |
yes | no | yes | yes | no |
| Placement Tracking | PRESERVE | SUITABLE |
LEFT SUITABLE |
RIGHT SUITABLE |
ROTATE 180 |
| NONE | yes | yes | yes | yes | yes |
| PITCH | yes | no | no | no | yes |
| BILLBOARD | yes | no | no | no | yes |
|
BILLBOARD FACING |
yes | no | no | no | yes |
Script
Script product allows to delegate functionality of a product to custom JavaScript code. For example external GStudio2 can be used to render the product.
Creating Script product
- Choose new "Script..." product and select your .js file.
- New JavaScript product appears in product bar.
- At this moment the script is not loaded. Script is loaded/reloaded when product is selected/reselected.
Predefined objects and their method summary
| Script | Summary |
| print(Object object) | Print value of the object to standard output. |
| printErr(Object object) | Print value of the object to error output. |
| connect(Dispatch source, Dispatch sink) | Register callback. Sink object will events from source connection point. |
| getGlobal(String name) | Return global object with given name or null. |
| setGlobal(String name, Object object) |
Set global object under given name. It is possible to delete global objects by choosing: Tools > Delete global script objects. |
| getService(String name) | Return service object or null if service does not exist. |
| dialog | Dialogs provider, see Dialogs bellow |
| Product | Summary | ||
| setOnAir() | Start production. | ||
| setOffAir() | End production. | ||
| setOnAirUnpaused() | Unpause paused product. | ||
| setThumbnail(String absolutePath) |
Set thumbnail of the product button. Optional, product button has default thumbnail. |
||
| getName() | Returns name of product. | ||
| control | Handler for incoming events. Implementation is required to be set, see example below. |
||
| Called after product is selected. | |||
| Called before product is deselected | |||
| load() | Called to start production. | ||
| unload() | Unpause paused product. | ||
| play() | Set thumbnail of the product button. Optional, product button has default thumbnail. |
||
| stop() | Called to stop production with fade out effect. | ||
| stopImmediately() | Called to stop production without fade out effect. | ||
| unpause() | Called to unpause paused product. | ||
| Dialogs | Summary |
| message(String title, String text) | Show message dialog. |
| input(String title String text) | Show input dialog. Returns entered string value. |
| alert(String title, String text) | Show alert dialog. |
Product.control implementation is required and must be set. See this stub:
Product.control = new function() {
this.load = function() {}
this.unload = function() {}
this.play = function() {}
this.unpause = function() {}
this.stop = function() {}
this.stopImmediately = function() {}
}ActionBox service
Creates action buttons next to product button firing events to script.
| add(String actionId) | Add new action. Title is the same as actionId. |
| add(String actionId, String title | Add new action. If action with given actionId already exists, its title is changed to new one. |
| remove(String actionId) | Remove action. |
| removeAll() | Remove all actions. |
| onAction | Handler for receiving action events. Assign a function of object. The function receives actionId as a parameter. |
Example code:
var actionBox = Script.getService("ActionBox")
actionBox.onAction = function(actionId) {
// handle action
}
actionBox.add("a1", "Action1")
actionBox.add("a2", "Action2")Result:
Script editor
Virtual placement contains built-in editor for script files.
Editor can be opened by clicking on “Edit script...” item in popup menu of the product.
| Save to file and apply it. It re-selects the product if already selected. | |
| Save to file. | |
| Show find dialog. | |
| Show find and replace dialog. | |
| Show shortcuts dialog. |
Script editor performs syntax validation. Syntax errors are displayed in tooltip when you place mouse over the red underlined text.
GStudio2 integration
There is a build-in support for GS2 Tk5. You can configure several title manager instances in config editor. All these instances are then injected into script as global variables.
Config XML fragment:
<Tk5>
<TitleManager name="GS" address="localhost"/>
</Tk5>The name attribute is the name of variable in the script where the title manager will be available.
When the address is not specified then Tk5's default is used. It is possible to have more than one connection to GStudio2.
Script can use standard COM event/sink mechanism to get events generated by Tk5. Use function Script.connect() to connect your event sink (implementation which receives the events) to event source (object which can generates the events). Example how to register onMessage event sink:
function MyCallbacks() {
    this.onMessage = function(msg) {
        // handle message
    }
}
Script.connect(GS.getClient(), new MyCallbacks())
Tracab Script
This type of product is based on Script product and provides extra access to Tracab service. This service is accessible via Script.getService("Tracab") call.
Tracab service
| getTeam() | Return selected team. |
| getSelectedPlayersCount() | Return selected players count. |
| getSelectedPlayerTeamId(int index) | Return team ID of player at given index. |
| getSelectedPlayerJerseyNumber(int index) | Return jersey number of player at given index. |
| getData(int teamId, int jerseyNumber, String attributeName) | Return attribute value of player specified by given team Id and jersey number. If player is not valid or value does not exist null is returned. For attribute name syntax see Variables section in Tracab Player Tracking chapter. For example TRACAB:myVariable. |
| onChange | Handler for receiving selected players change event. Implementation example bellow. |
Example
var tracab = Script.getService("Tracab")
tracab.onChange = function() {
// handle event
}
Trajectory
Creates keyframe-animated trajectory, following e.g. ball.
To create a trajectory product, a Trajectory Style file (.trs) has to be provided. Default .trs file is available on Download Area, packed into the default_data.zip archive.
To start keyframing a trajectory, enter recorded camera or clip. After selecting the product, locate the tracked object in video and click on it. A manipulator shows up. By jogging forward and moving the manipulator, a trajectory animation is being keyframed. It is possible to jog back and refine the animation when needed.
Trajectory product button provides additional buttons for moving to previous/next closest keyframe, for removing all keyframes or for removing keyframe at current time.
The Trajectory product might be disabled. You can enable it manually in the Config editor → Advanced tab. Find the 'Trajectory' product entry in the Products section and change value of 'enabled' attribute to '1'.
<Products>
<Product enabled="1" type="Trajectory"/>
</Products>