The various configuration settings determine the behavior and appearance of PRIME.
To access - In the top menu bar, select Config and select the desired item to configure:
- Playout Configuration
- Automation
- Devices
- Keyboard Shortcuts
- Settings
- Import Configs
- Export Configs
Settings Configuration
Selecting Settings from the Config drop down menu allows the user to change various aspects of PRIME.
General
Theme
- ChyronDark - Sets Prime’s UI/UX to Dark theme
- Standard - Sets Prime’s UI/UX to Light theme
General
- Prompt Before Closing – If checked, PRIME will confirm with the user whether or not PRIME is to be closed.
- Prompt Administrator Warning on Startup – To run out of process VB,JScripts Prime needs to be started with Administrator privileges.
- Prompt for Playout Configuration – Shows the Prime Startup Configuration Screen pop up upon startup of Prime. Turning this off will Startup Prime in the last chosen Configuration.
- Start Minimized – Starts Prime in a minimized state within the Windows Environment
- Start in Automation Mode - Starts Prime in a minimal Playout mode which can only be operated by an Automation System. Prime Scene Designer is unavailable while in this mode.
Status
- Show Bypass Indicator - shows the bypass indicator in the status bar of the playout window
- Show SDI Input Indicators - shows the SDI Input Indicators in the status bar of the playout window
Layout
- Auto Save Layout - automatically saves the current layout when changes are made (ie the layout should look the same when the application is restarted)
- Always Show Both the Preview and Program Channel - if both the Preview and Program panels of a channel are not visible in the layout, and one is made visible, then the other will also be made visible
Import/Export Settings
Allows users to export a series of settings into a zip file allowing users to import them on a target machine elsewhere. Any files in the source machines “Common” folder will be extracted to the target machines “Common Folder” only if a Common folder is defined on the target machine.
- Status – if the system is run in downstream mode and an external bypass panel is installed, the following options may be configured
- Show Bypass Indicator – Show an icon on the main Runtime user interface toolbar
- Show SDI input Indicator - Show an icon on the main Runtime user interface toolbar
- Layouts - Auto Save Layout option automatically saves the changes that are made to the layout
-
Always Show Both the Preview and Program Channel
- If setting is checked, both preview and program channel controls will be made visible when a channel is activated.
- If setting is not checked, only the visible section of the channel will be activated and the user can hide either or both.
- *Enabled (checked) by Default.
Playout
Numeric Keypad Entry
When Numeric Keypad Entry is enabled numeric and alphanumeric values can be applied to the keypad entry field in the Runtime interface.
Users can use Numeric Keypad playout mode for either Clips or Graphics. For Graphics the order of precedence will be: Scenes then Messages. Channel selectors will appear on the main toolbar. Shortcut keys can be assigned to select the “Active” channel. See Shortcut Key Manager for configured shortcut keys.
Scenes, Messages or Clips will load to the active channel i.e whichever channel has focus. This means that the scene’s default Channel will not be honored if the Channel property is set in Designer. See Scene Properties for more information
Track Recall Per Channel - (applicable when operating PRIME with a multi channel graphics or clip player system). When selected, the Keypad Entry field will populate the text value of the next numeric or alphanumeric graphic (scene, message) or clip for the selected channel. When unchecked, multiple channels share the same value for recall.
Allow Recall Box Focus - When checked, operator can tab or mouse click into the recall box to open a scene or message. When unchecked, Recall Box is only accessible via Numpad keys.
Messages
Show Folder Selector - When this is enabled, Messages folder selection will be visible in Prime playout UI.
Click on Messages Icon to add or remove messages folders.
Numeric keypad entry will apply to the selected message folder. Select from drop down to change selected folder.
Preview > Load Behavior
- Multiple Scenes: Infinite number of scenes/messages can be loaded in preview regardless of layer assignment.
- Single Scene Per Layer: Only one scene per layer can be loaded per preview channel. A scene with the same layer assignment will displace the other.
- Single Scene Only: Only one can be loaded in preview regardless of layer assignment.
Skip Preview In for Program - When checked, Preview in Event animations state will be skipped on Program Channel. This results in consistent effect in behavior in case where scene is played directly to Program Channel.
Example use case: In Preview in Event a clip is set to cue frame 30, at its revealed state. But when the same scene is played to air, the clip should play from frame zero.
Output Media File Name Tags
Users can specify the format of the filename when exporting images and clips from Prime Playout.
File Name Tag Options:
- {channel_name} Name of the channel.
- {date_time} Current date and time of the system.
- {scene_name} Name of the active scene on the channel.
- {message_name} Name of the active message on the channel.
- {display_name} Name displayed in channel.
For scenes: {scene_name} is the scene name; {message_name} is blank, {display_name} matches {scene_name}.
For messages: {scene_name} is the underlying scene name, {message_name} is the message name, {display_name} matches {message_name}
Control Panel
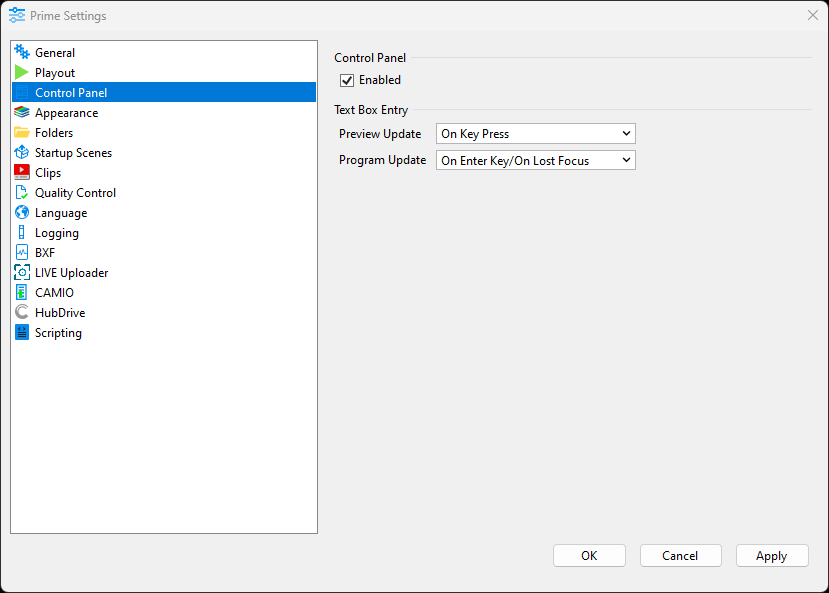
Enabled
- Enables and Disables the Control Panels / Replaceables Panel in Playout
- When unchecked (Disabled), Playout will deactivate the Control Panel option
Text Box Entry
Specifies when changes to control panel text boxes should be applied to an output.
Preview and Program Update allow for the following options:
- On Key Press - immediately when a key is pressed
- On Enter Key/On Lost Focus - only when Enter is pressed, or the control loses focus
Appearance
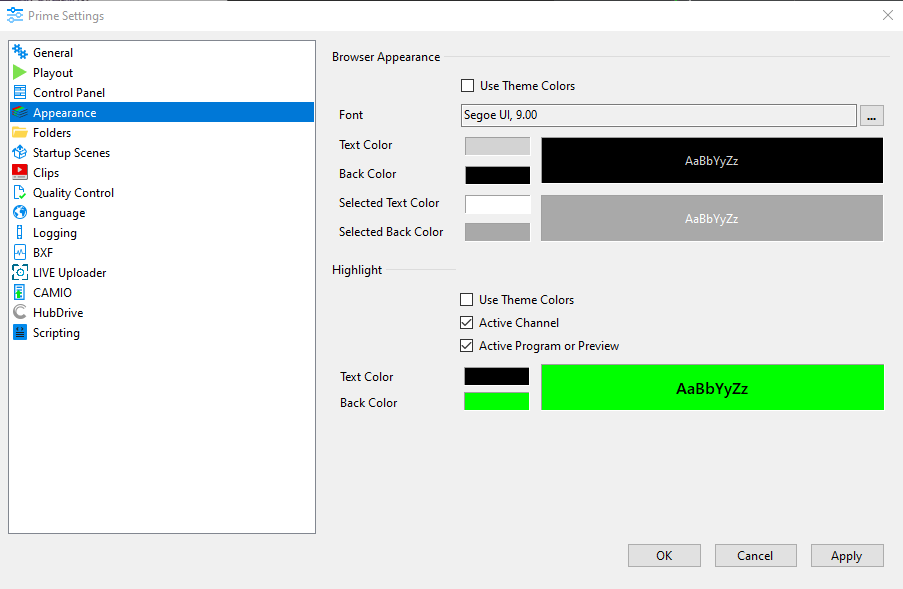
Browser: Allows users to customize the appearance of all browsers in the PRIME application
Highlight: Allows users to customize the appearance of the active channels and active Preview or Program
Folders
*Each folder’s file path has a shortcut button to quickly set the desired folder location.
- Common Folder – ChyronHego suggests the use of a “Common” folder. This stops the need for assets to be stored multiple times in multiple directories.
- Root Project Folder- Define the root folder for all your projects.
-
Root Settings Folder - Defines the folder location of all the configurations, layouts etc.
This is tied to the startup screen. -
CAMIO Folder - This folder location will contain all the Project folders. These Project folders contain their associated assets (MOS Messages, CRD files and replaceable assets).
The PRIME messages in the “Message” folder can be called up in PRIME playout.
******* IMPORTANT *******************************************
The CAMIO Context MUST match the PROJECT Name.
Example: Context: News 5PM PRIME Project: News 5PM
*******************************************************************
Startup Scenes
Scenes can be set to load or play when the PRIME application starts.
Clips
Read Clip Metadata from file Name Tags:
PRIME has the ability to add metadata to the associated clip metadata file when the clip is imported using the “Folder Watcher” application.
The metadata is part of the command line.
When clip files are imported into Prime (ie, when .ppc files are generated when a new clip file is placed into the Clips folder of a project), and this option is enabled, then the file name will be parsed for these metadata tags.
If found, the metadata values will be set in the .ppc automatically
Generate Unique Clip Name
Clip File Name Tag
Quality Control
The Quality Control settings allow the user to define Quality Control states.” These allow users to see the state of scenes. This comes into play in the distribution of scenes and their associated assets. See Asset Viewer also.
To view Quality Control states, select Details View from the Scene Browser. This allows the Quality Control field to appear in the scene list. From there, a state may be set as defined in the Quality Control Settings section.
Language
Language Settings allow the user to select from the available list of languages. Once a language is selected, the PRIME User Interface will switch languages.
| Note: Not all language translations are guaranteed to be accurate |
Logging
Logging Settings enable the user to configure logging for the main PRIME application.
Beginning in 5.0, the Default locations for Prime Logs will be the following
Prime Logs Location:
C:\ProgramData\Chyron\Prime\Logs
Workflow Logger Log Location:
C:\ProgramData\Chyron\Prime\Logs\Workflow
The Workflow Logger will log specific events in the application
The workflow logging is useful for viewing the order of events that happen with a scene or scenes. The workflow log window can be viewed from the main Runtime user interface.
You can select which events will be logged in the Workflow Monitor.
Only check the Auto create dump file checkbox when asked to do so by ChyronHego service.
The Scene Logger
Scenes have a logger built into them. Clicking the log bar will show the current Scene Logger:
BXF
See the section that explains the BXF object as a scene resource
Chyron LIVE Uploader
See the section that explains LIVE Uploader so users can Upload their graphics from Prime to Chyron LIVE.
CAMIO
Apply your CAMIO Server settings here.
FileSync
FileSync, previously known as Chyron Hub Drive, allows users to remotely sync PRIME Projects, files, and folders.
Scripting
These settings allow Prime to function in Sandbox mode when unchecked. In addition it allows users to preview animations, without running/executing scripts. If a scene is loaded that utilizes a script, and Prime script settings is disabled, then Prime will log warning that the script can not compile and execute.
Hardware/Playout Configuration
Refer to the separate PRIME_Playout Configuration Guide
Subchannels
Subchannels are smaller defined areas of a larger output channel. Each subchannel is defined by its resolution and its “X” and “Y” position within the larger output channel.
Each subchannel can have its own preview and output in the main Runtime user interface.
You can have independent scene browsers for each subchannel that only shows scenes with the exact same resolution as the subchannel itself to ensure only scenes designed for that resolution can be played.
Replaceables-Automation IDs
Object properties that can be “Replaced” by automation are added to this list. A Node in the Scene tree “Resources” section will display the “Replaceables Automation ID Editor”. Objects are required to be exposed in the Replaceable Editor for Update In/Out to execute; including for manual playback. Add items here
Configuration
| Automation Configuration is documented in the Prime Automation Guide" |
Preparing the Scene for Automation (The Replaceables-Automation List)
Commands that update scene objects can be connected in the following manner:
- By the scene Object name
- By the Control Panel name
- By the ID name from the automation list
Scene Object Name: The name of the object from the Scene Tree
Control Panel Name: The name of the control Panel from the Control Panel section of the Scene Tree
Replaceables-Automation List: The name of the ID from the Automation ID Editor
- Id: This is the ID automation will use to identify this item.
- Description: This is a user-friendly description and is also used in the NRS Plugin (LUCI) as the label for the replaceable item.
- Bindings: Object(s) Properties bound
- Order: Used by legacy commands that expect the data in the order they are given in the command. The “W” command is a good example: W\100\200\A\B\C\\
- Auto Erase: Should the default value of this property be erased when viewed or loaded.
-
External Update: When checked, the replaceable is marked to send and receive X and R commands respectively. Each replaceable is identified by is Bindings descriptor. Referencing the picture above a X command would be sent as follows
X\1\****\Locator L3\Name.Text\Title.Text\Logo.File\\
The automation system would respond with an R Command
R\1\Melville, NY\Joe Smith\Smith_Joe.jpg
| See the Prime Automation Guide for more. |
- Character Limit: Enforce a maximum number of characters when applying data supplied to this replaceable.
For example, with a character limit of 5 a replaceable that received the value "ChyronHego" would only be updated with the truncated value “Chyro"
To enter items into the Automation List, drag any property or keyframe into the list. Each item in the list can be bound to multiple properties.
To get a keyframe into the list drag the keyframe from the Keyframe property window NOT the keyframe from within the Timeline.
In this example, there are two properties bound to ID# 1
Note: Some scenes may contain Objects and Replaceable IDs that share the same name and are completely unrelated. In this case, the Object name will take precedent when a P/UPDATE command is received.
Devices Configuration
The Devices Settings panel provides the ability to add and edit an external device, as well as display a log of device activity once the connection is live. PRIME allows for either a GPI or X-keys device to be used.
The following parameters are displayed in the Device Settings panel:
- Type - Displays a GPI or X-Keys symbol as the type of device.
- Name - The name given to the device.
- Enable on Startup - If enabled, then the device will be enabled every time that PRIME is started.
- Status - Displays Enabled, Disabled or Waiting for Connection as the current status of the device.
To configure the Automation Log:
- Select the Automation Log drop-down menu to either Copy or Save the log.
- Enable Show Data to show the data from the Automation Log.
- Select Clear Log to clear the displayed data from the Automation Log.
- Each log item will display the time of event, the connection in use and a message.
To edit a device setting, do one of the following:
- Click the item in the Devices list, and then click the Edit icon. The Device panel for the item will open.
- Double-click the item in the Devices list. The Device panel for the item will open.
- Right-click the item in the Devices list, and then click Edit on the drop-down menu. The Device panel for the selected item will open.
To delete a device, do one of the following:
- Click on the item in the Devices list, and then click Delete icon.
- Right-click the item in the Devices list, and then click Delete on the drop-down menu.
To enable a device, do one of the following:
- Click on the item in the Devices list, and then click Enable icon.
- Right-click the item in the Devices list, and then click Enable on the drop-down menu.
GPI In
Up to 16 GPI inputs may be configured in PRIME. To add a GPI connection:
- Select the GPI icon located on the top toolbar of the Device Settings panel.
- Enable on Startup - Check the Enable on Startup check box to automatically enable the GPIs upon PRIME startup.
- The Board Index specifies the GPI number. Enter the desired Board Index, using the spin box.
- Bounce specifies the minimum amount of time, in milliseconds, between triggers. This prevents accidental triggering due to unintended multiple button pushes, which could be caused, for example, by a dirty switch. The default Bounce setting is 10 ms. To change the setting, enter a new setting or select using the spin box.
To configure GPI Pins:
- Select the desired pin to be configured by clicking the corresponding box. Note that the Selected Pin (0) group box label will reflect the number of the selected pin. Pins are numbered from left to right as follows:
- 0 through 7 in the top row
- 8 through 15 in the bottom row
- An action can be executed on both the Rise, i.e., when the GPI button is pressed, and the Fall, i.e., when the GPI button is released. To set Rise and/or Fall actions:
- Check/uncheck the Rise and/or Fall checkboxes to enable or disable GPI execution when the button is pressed (Rise) and/or released (Fall).
- From the Execute drop-down, select an action to execute when the button is pressed (Rise) and/or released (Fall). The available actions are as follows: Clear Channel, Select Channel, Cue Clip, Pause Clip, Play Clip, Stop Clip, Jog Clip (Fast Forward), Jog Clip (Rewind), Load Playlist, Play Playlist, Stop Playlist.
-
From the Channel drop-down, select the Channel and Layer to which the action should apply when the button is pressed (Rise) and/or released (Fall).
Depending upon the action that is selected from the Execute drop-down, additional information may be requested. In the previous figure, Play Playlist is selected as the action to be executed when the GPI button is released. The Select Playlist enable check box and Select Playlist drop-down are also displayed, in addition to the Channel enable check box and Channel/Layer selection drop-down.
To clear all pins:
- Select Clear Pins located on the top of the GPI configuration dialog.
| For GPI Out see “GPI Out” in the “Resources” section! |
X-Keys
X-keys® are a programmable keyboard that can be customized. To add an X-keys connection:
- Select the X-Keys icon located on the top toolbar of the Device Settings panel.
- Select the corresponding X-keys model to be configured using the dropdown menu located next to Device Layout label.
- Once selected, the X-keys model name will be displayed.
- X-keys can be purchased through the X-keys website: http://xkeys.com
- The white boxes represent the buttons in the X-keys layout. Click a box that is to be assigned a function to be executed. The box will become highlighted.
- Using the drop-down located in the Selected Key group box, select the desired function to be assigned to the highlighted key.
- If a function regarding a Clip or Playlist is chosen (Ex: “Cue Clip” or “Load Playlist”), then option to specify a Clip or Playlist as well as the Channel will appear.
- Click Accept Changes to finalize your selection.
To clear all X-keys configurations:
- Click the Clear Keys button located on the top toolbar.
Import and Export Configs
PRIME Playout > Config
Import Configs
Export Configs
PRIME export’s configuration files as a single zip file. By default will include: Settings, PSK, DSK, Auto, WXPL, Config and WXEL configuration files. User can deselect items as desired.
This method is ideal for replicating on additional prime devices, performing backups, and providing Chyron Customer Success the necessary config files for assistance.
Import Process
- Select Import Configs
- Choose a PRIME exported configuration zip file
- Choose all or desired config files to import
- Click Import Selected
- Restart PRIME for new configuration files to take effect
Export Process
- Select Export Configs
- Choose all or certain configuration files to export
- Click Export Selected and save zip file